
Ultimate Guide: How to Clean a Shower Tray for Spotless Results


Cleaning your shower tray is an important part of maintaining a clean and hygienic bathroom. A dirty shower tray not only looks unsightly but can also harbor bacteria, mold, and mildew. Regular cleaning is essential to keep your shower tray looking brand new and to prevent any potential health hazards.
When it comes to cleaning your shower tray, there are a few key steps you should follow for spotless results. Firstly, it is important to remove any loose debris or hair from the tray. Use a drain cover or sieve to catch any hair or other particles that may clog the drain. This will make the cleaning process easier and prevent any blockages.
Next, choose a cleaning solution that is suitable for your shower tray material. Different materials may require different cleaning solutions, so it is important to check the manufacturer’s recommendations. A mild, non-abrasive cleaner is usually a safe option for most shower trays. Apply the cleaner to the tray and let it sit for a few minutes to loosen any grime or stains.
After allowing the cleaner to work, use a sponge or brush to scrub the shower tray gently. Pay extra attention to any areas with stubborn stains or build-up. Rinse the tray thoroughly with warm water to remove any residue. Finally, dry the shower tray with a clean towel or cloth to prevent water spots or streaks.
By following these simple steps and regularly cleaning your shower tray, you can maintain a clean and hygienic bathroom. Not only will your shower tray look spotless, but you can also enjoy a fresh and pleasant showering experience. So, take the time to clean your shower tray and enjoy the benefits of a sparkling clean bathroom!
Ultimate Guide to Achieving Spotless Results: How to Clean a Shower Tray


Introduction
Keeping your shower tray clean is essential for maintaining a hygienic and visually appealing bathroom. Over time, soap scum, hard water stains, and grime can build up on the surface, making it look dull and dirty. However, with the right tools and techniques, you can easily restore your shower tray to its original spotless condition.
1. Gather Your Supplies
Before you begin, make sure you have all the necessary cleaning supplies on hand. This will save you time and ensure you have everything you need to tackle the job.
- Bathroom cleaner
- Vinegar
- Baking soda
- Toothbrush or scrub brush
- Microfiber cloth or sponge
- Rubber gloves
2. Remove Excess Debris
Start by removing any large debris, such as hair or soap chunks, from the shower tray. Use a paper towel or tissue to pick up these items and dispose of them in the trash.
3. Apply Cleaning Solution
Spray a generous amount of bathroom cleaner or vinegar onto the surface of the shower tray. Allow the cleaning solution to sit for a few minutes to penetrate and loosen the dirt.
4. Scrub Away Dirt and Stains
Using a toothbrush or scrub brush, scrub the shower tray in a circular motion to remove dirt, soap scum, and stains. Pay special attention to the corners and edges of the tray, as these areas tend to accumulate more grime.
5. Tackle Stubborn Stains with Baking Soda

If there are any stubborn stains that the cleaner couldn’t remove, sprinkle some baking soda on the affected areas. Wet the toothbrush or scrub brush and scrub the baking soda into the stains until they loosen and disappear.
6. Rinse Thoroughly
Once you have scrubbed the entire shower tray, rinse it thoroughly with warm water. Use a sponge or microfiber cloth to remove all traces of cleaner and baking soda.
7. Dry and Shine

Finally, use a clean microfiber cloth to dry the shower tray and buff it to a shine. This will help prevent water spots and streaks from forming.
8. Regular Maintenance
To keep your shower tray looking spotless, it’s important to perform regular maintenance. This includes wiping down the surface after each use, using a squeegee to remove excess water, and periodically deep cleaning as described in this guide.
Conclusion
By following these steps and incorporating regular cleaning into your routine, you can easily achieve spotless results when cleaning your shower tray. A clean shower tray not only improves the overall appearance of your bathroom but also contributes to a more hygienic bathing experience.
Preparing for the Cleaning Process: Essential Tools and Materials
Gather the necessary tools:
- Rubber gloves – These will protect your hands from cleaning chemicals and dirt.
- Scrub brush – A stiff-bristled brush is ideal for removing tough stains and grime.
- Sponge or cloth – Use a soft sponge or cloth for general cleaning and wiping down the shower tray.
- Plastic scraper – This tool can be used to scrape off stubborn residue without damaging the surface of the shower tray.
- Bucket – Use a bucket to mix cleaning solutions and hold water for rinsing.
Assemble the necessary materials:
- All-purpose cleaner – Look for a cleaner specifically formulated for bathroom surfaces.
- Vinegar – This natural cleaning agent can help remove soap scum and mineral deposits.
- Baking soda – Use baking soda as a gentle abrasive to scrub away stains.
- White distilled vinegar – Dilute this vinegar with water for a homemade cleaning solution.
- Lemon juice – The acidity of lemon juice can help dissolve limescale and stains.
Note: Before using any cleaning products or chemicals, refer to the manufacturer’s instructions to ensure they are safe for use on your shower tray material. It’s also a good idea to wear protective goggles if you are working with particularly strong chemicals.
Removing Dirt and Grime: Step-by-Step Instructions
Keeping your shower tray clean is essential for maintaining hygiene and preventing the build-up of dirt and grime. Follow these simple step-by-step instructions to remove dirt and grime effectively:
- Gather your cleaning supplies: Before you begin, gather all the necessary cleaning supplies. This may include a scrub brush or sponge, mild soap or detergent, vinegar, baking soda, and a microfiber cloth.
- Preparation: Start by preparing the shower tray for cleaning. Remove any items or accessories such as shower curtains or bath mats.
- Dry cleaning: Use a dry cloth or brush to remove loose dirt, hair, and debris from the shower tray. Pay close attention to corners and crevices where dirt tends to accumulate.
- Prepare a cleaning solution: Depending on the type of shower tray you have, prepare a suitable cleaning solution. For a basic cleaning solution, mix a few drops of mild soap or detergent with warm water. For tougher stains, you can use a paste made of baking soda and water or a mixture of vinegar and water.
- Cleaning process: Dip a sponge or scrub brush into the cleaning solution and start scrubbing the shower tray. Focus on areas with visible dirt and grime, such as the corners, edges, and any stained or discoloured areas.
- Rinse thoroughly: Once you have scrubbed the entire shower tray, rinse it thoroughly with warm water. This will help remove any remaining soap or cleaning solution.
- Drying: After rinsing, dry the shower tray with a clean, dry cloth or a microfiber cloth. Make sure to remove any excess water to prevent water stains or mineral deposits.
- Finishing touches: Finally, give your shower tray a polished finish by wiping it down with a dry microfiber cloth. This will remove any streaks or watermarks and leave your shower tray looking spotless.
Following these step-by-step instructions will ensure that you effectively remove dirt and grime from your shower tray, leaving it clean and hygienic for your next shower.
Tackling Stubborn Stains: Effective Methods for Different Types of Stains
1. Soap Scum
Soap scum can be a common problem in showers, but it can be easily removed with the right cleaning methods.
- Mix equal parts of white vinegar and water in a spray bottle.
- Spray the solution onto the soap scum and let it sit for a few minutes.
- Scrub the area with a sponge or brush, focusing on areas with heavy buildup.
- Rinse the area thoroughly with water, removing any remaining residue.
- For stubborn soap scum, you can also use a paste made of baking soda and water. Apply the paste to the affected area, let it sit for a few minutes, and scrub before rinsing.
2. Hard Water Stains
Hard water stains can be tough to remove, but with the right approach, you can tackle them effectively.
- Mix equal parts of white vinegar and water in a spray bottle.
- Spray the solution onto the hard water stains and let it sit for a few minutes.
- Use a sponge or brush to scrub the stains, applying some additional vinegar if needed.
- Rinse the area thoroughly with water to remove any remaining residue.
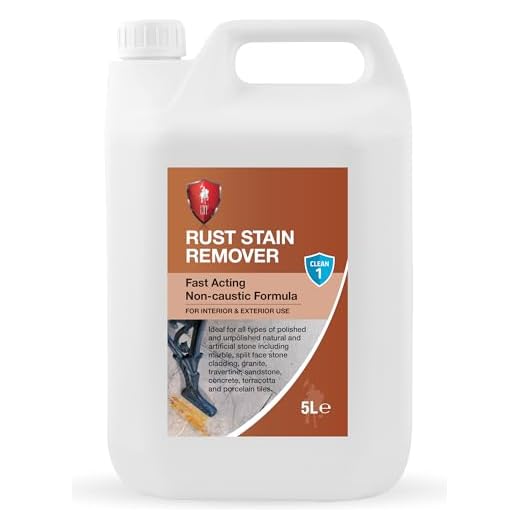
3. Rust Stains
Rust stains can be particularly stubborn, but there are several methods that you can try to remove them.
- Use a commercial rust remover that is safe for use on shower trays. Follow the instructions on the product.
- If you prefer a natural approach, you can create a paste by mixing lemon juice and borax. Apply the paste to the rust stains, scrub with a brush, and rinse thoroughly.
- Another option is to use a mixture of cream of tartar and hydrogen peroxide. Apply the mixture to the rust stains, scrub gently, and rinse.
4. Mildew and Mold
Mildew and mold can be a common problem in showers, but there are effective methods to eliminate them.
- Create a cleaning solution by mixing equal parts of water and bleach.
- Spray the solution onto the affected areas and let it sit for a few minutes.
- Scrub the areas with a brush or sponge to remove the mildew and mold.
- Rinse thoroughly with water.
- For a natural alternative, you can use a mixture of white vinegar and water. Spray the solution onto the mold or mildew, let it sit for a few minutes, scrub, and rinse.
5. Stains on Acrylic or Fiberglass Shower Trays
Acrylic or fiberglass shower trays require special care to avoid damaging the surface.

- Avoid using abrasive cleaners or scrub brushes that can scratch the surface.
- Use a non-abrasive cleaner specifically formulated for acrylic or fiberglass surfaces.
- Gently scrub the stains using a soft sponge or cloth.
- Rinse thoroughly with water.
- For stubborn stains, create a paste using baking soda and water. Apply the paste to the stains, let it sit for a few minutes, and gently scrub before rinsing.
Remember to always follow the manufacturer’s instructions and test any cleaning product or method in an inconspicuous area before applying it to the entire shower tray.
Preventing Mold and Mildew: Tips for Maintaining a Clean Shower Tray

Mold and mildew can quickly develop in a shower tray if not properly maintained. These fungi not only look unsightly, but they can also pose health risks and cause unpleasant odors. Here are some tips to prevent mold and mildew growth and maintain a clean shower tray:
1. Clean Regularly
- Use a cleaning solution: Regularly clean your shower tray using a suitable cleaning solution. This will help remove any soap scum, dirt, and bacteria that can promote the growth of mold and mildew.
- Scrub with a brush: Use a soft brush or sponge to scrub the shower tray, paying attention to corners and hard-to-reach areas. This will help remove any stubborn stains and prevent the buildup of grime.
2. Dry Thoroughly
- Wipe down after each use: After using the shower, wipe down the tray with a dry towel or squeegee to remove excess water. This will prevent moisture from lingering and create an environment where mold and mildew can thrive.
- Open windows or use ventilation: Ensure proper ventilation in your bathroom by opening windows or using a fan. Good airflow helps to reduce moisture levels and prevent mold and mildew growth.
3. Remove Standing Water
- Unclog drains: Keep your shower tray drain clean and free of debris to prevent water from accumulating. Standing water provides a perfect breeding ground for mold and mildew.
- Use a shower mat: Place a non-slip shower mat on the tray to elevate your feet slightly and allow water to flow down the drain. This will help prevent the buildup of standing water.
4. Seal Grout and Tiles
- Apply a grout sealer: Regularly apply a grout sealer to the shower tray’s grout lines to protect them from moisture absorption. This will help prevent mold growth between the tiles.
- Clean and repair grout: Inspect the grout regularly, and clean or repair any damaged areas promptly. Cracked or crumbling grout can harbor moisture and promote mold and mildew development.
5. Use Mold-Resistant Materials
- Choose mold-resistant shower curtains: Opt for shower curtains made of mold-resistant materials, such as nylon or polyester. These materials are less likely to develop mold and can be easily cleaned if necessary.
- Consider tile alternatives: If you have the option, consider using materials like acrylic or solid surface panels for your shower tray instead of traditional tiles. These materials are less prone to mold growth and are easier to maintain.
By following these tips, you can prevent mold and mildew from taking hold in your shower tray, ensuring a clean and hygienic bathing experience.

Finishing Touches: Enhancing the Shine and Freshness of Your Shower Tray
1. Dry the Shower Tray
After cleaning the shower tray, it’s important to dry it thoroughly to prevent any residual moisture from causing mold or mildew to grow. Use a clean, dry towel or a squeegee to remove any water or cleaning solution from the surface of the tray.
2. Apply a Protective Coating
To further enhance the shine and freshness of your shower tray, consider applying a protective coating. There are various products available on the market specifically designed for shower tray surfaces. Follow the manufacturer’s instructions for application and ensure proper ventilation while applying the coating.
3. Use a Shower Tray Cleaner
To maintain the cleanliness of your shower tray, regularly use a specialized shower tray cleaner. These cleaners are formulated to remove soap scum, hard water stains, and other grime that can accumulate on the surface. Follow the instructions on the cleaner’s packaging for best results.
4. Avoid Abrasive Cleaners
Avoid using abrasive cleaners or scrub brushes that can scratch or damage the surface of your shower tray. Instead, opt for non-abrasive cleaners that are safe for use on the specific material of your shower tray. This will help maintain its shine and prevent any unwanted marks or scratches.
5. Wipe Down After Each Use
Get into the habit of wiping down your shower tray after each use. This will help prevent water spots and soap residue from building up on the surface. Use a soft cloth or towel to quickly wipe away any excess moisture or product residue to keep your shower tray looking clean and fresh.
6. Use a Drain Cover
To prevent hair and other debris from clogging your shower tray drain, consider using a drain cover. This simple accessory can help prolong the cleanliness of your shower tray by catching any potential blockages before they reach the drain. Clean the drain cover regularly to prevent buildup.
7. Install Proper Ventilation
Poor ventilation in the bathroom can lead to excess moisture and mold growth, which can affect the cleanliness and freshness of your shower tray. Install an exhaust fan or open a window during and after showering to allow steam to escape and keep the air circulating.
8. Regular Maintenance
Regularly inspect your shower tray for any signs of damage or wear and tear. Fix any cracks, chips, or loose caulking promptly to prevent further damage and maintain the overall appearance of your shower tray. Following a regular maintenance routine will help keep your shower tray looking its best for years to come.

By following these finishing touches, you can enhance the shine and freshness of your shower tray, ensuring a clean and inviting bathing experience every time.
FAQ
What are some tips for cleaning a shower tray?
Some tips for cleaning a shower tray include using a mild cleaning solution, scrubbing with a non-abrasive brush, and rinsing thoroughly.
What should I use to clean a shower tray?
You can use a mild cleaning solution such as a mixture of water and vinegar or a commercial bathroom cleaner. Avoid using abrasive cleaners or scrub brushes that can damage the surface of the shower tray.
How often should I clean my shower tray?
It is recommended to clean your shower tray at least once a week to prevent the buildup of soap scum and mould. However, the frequency may vary depending on how often the shower is used and how dirty it gets.
What is the best way to remove soap scum from a shower tray?
The best way to remove soap scum from a shower tray is to spray it with a mixture of water and vinegar, let it sit for a few minutes, and then scrub with a non-abrasive brush. Rinse thoroughly afterwards.
Can I use bleach to clean a shower tray?
While bleach can be effective in removing stains and disinfecting, it is not recommended to use bleach on a shower tray. Bleach can be too harsh and may cause damage to the surface of the tray. It is better to use a mild cleaning solution or a commercial bathroom cleaner.


