Step-by-Step Guide: How to Clean a Coffee Maker for Sparkling Results


Are you tired of your coffee not tasting as fresh as it should? It may be time to give your coffee maker a good cleaning. Over time, mineral deposits, oils, and other residue can build up and affect the taste of your brewed coffee. But don’t worry, with a few simple steps, you can have your coffee maker looking and performing like new.
First, gather the necessary supplies: white vinegar, water, a clean rag or sponge, and a small brush or toothbrush. Then, unplug your coffee maker and remove any coffee grounds or filters. Disassemble any removable parts, such as the carafe and filter basket, and wash them with warm, soapy water. Rinse them thoroughly and set them aside to dry.
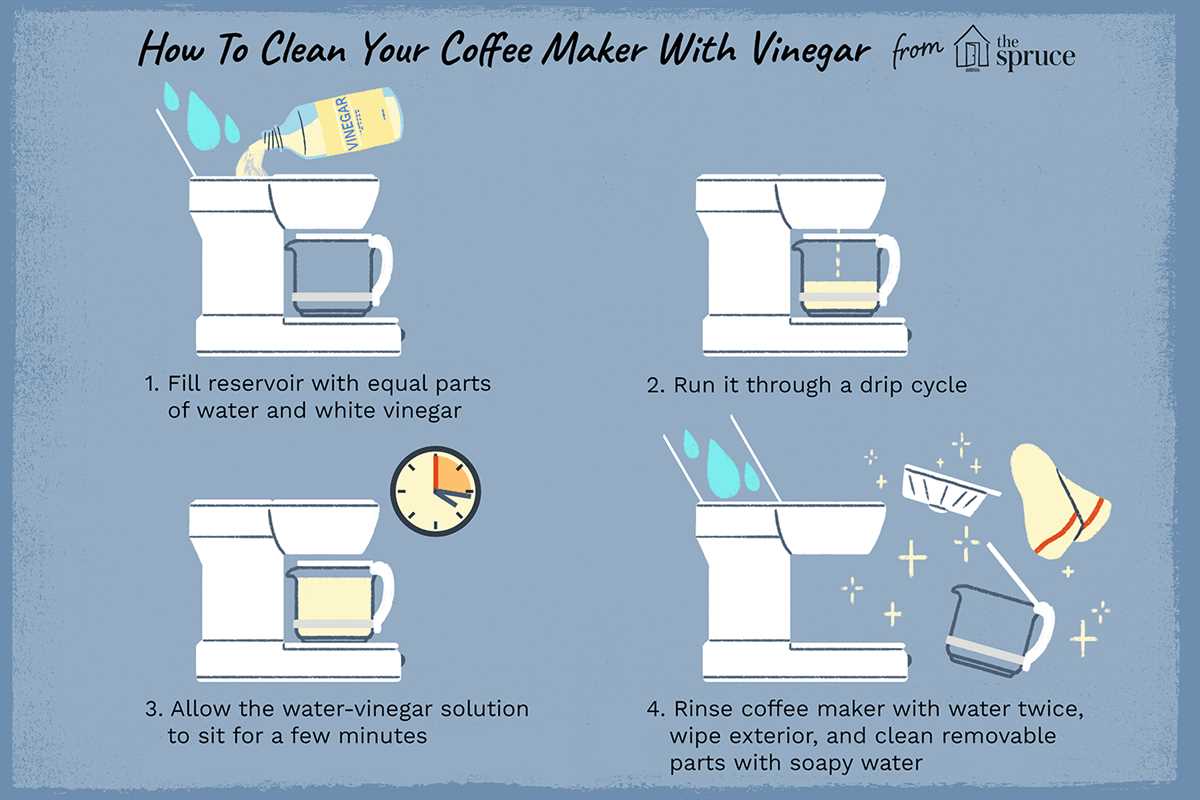
Next, mix a solution of equal parts vinegar and water. Fill the water reservoir of your coffee maker with the vinegar mixture. If your coffee maker has a separate reservoir for brewing water, be sure to fill that as well. Place a clean filter in the filter basket and turn on the coffee maker. Allow the vinegar mixture to brew halfway, then turn off the machine and let it sit for 30 minutes to an hour. This will allow the vinegar to break down any mineral deposits and oils.
After the vinegar has had time to work its magic, turn the coffee maker back on and allow it to finish brewing. Dispose of the vinegar mixture and run a couple of cycles with fresh water to rinse out any remaining residue. Finally, wipe down the exterior of your coffee maker with a clean rag or sponge. Don’t forget to clean any other surfaces that may have come into contact with coffee or water.
Remember, regular cleaning of your coffee maker is important for maintaining the quality of your coffee and the longevity of your machine. By following these simple steps, you’ll be able to enjoy a fresh and delicious cup of coffee every time.
Gather the necessary supplies
Cleaning solution

In order to effectively clean your coffee maker, you will need a cleaning solution. There are several options available, but one of the most popular choices is a mixture of equal parts white vinegar and water. This natural solution is effective at removing mineral buildup and residue from coffee oils.
Water
You will also need water to mix with the cleaning solution and rinse the coffee maker. It is best to use filtered water to ensure the best taste in your coffee and prevent any additional mineral buildup.
Cloth or sponge
A soft cloth or sponge is necessary to wipe down the exterior of the coffee maker. Avoid using abrasive materials that could scratch the surface.
Toothbrush or small brush
A toothbrush or small brush can be used to clean hard-to-reach areas, such as the coffee grinder or crevices around the filter. This will help remove any built-up coffee grounds or residue.
Microfiber cloth
A microfiber cloth is great for drying and polishing the coffee maker after cleaning. It is lint-free and will leave your coffee maker shining.
Cleaning tablets
For those who prefer a quicker and more convenient option, cleaning tablets specifically designed for coffee makers are available. These tablets are pre-measured and dissolve in water to provide a thorough cleaning.
Optional descaling solution or citric acid
If you are dealing with heavy mineral deposits or hard water stains, you may need to use a descaling solution or citric acid. These substances are powerful at removing stubborn buildup and restoring the performance of your coffee maker.
Clean the carafe and filter basket
Regularly cleaning the carafe and filter basket is essential for a sparkling clean coffee maker and to ensure that your coffee tastes its best. Follow these simple steps to clean the carafe and filter basket:
- Empty the carafe and remove any remaining coffee grounds.
- Wash the carafe and filter basket with warm, soapy water. Use a gentle dish soap and a sponge or soft cloth to scrub away any coffee stains or buildup.
- Rinse thoroughly with clean water to remove any soap residue.
- For stubborn stains or buildup, add a mixture of equal parts water and white vinegar to the carafe and let it sit for a few minutes. Then scrub away the stains with a sponge or brush.
- Rinse again with clean water to remove any vinegar residue.
- Allow the carafe and filter basket to air dry completely before reassembling your coffee maker.
By regularly cleaning the carafe and filter basket, you can ensure that your coffee maker is free from accumulated residue and coffee oils, providing you with a better tasting cup of coffee every time you brew.
Descale the coffee maker
Descaling your coffee maker is an essential step in keeping it clean and functioning properly. Over time, mineral deposits can build up inside the machine, affecting the taste of your coffee and slowing down its brewing process. Follow these simple steps to descale your coffee maker and ensure sparkling results:
- Prepare a mixture of descaling solution and water in the recommended ratio. Check the user manual for specific instructions on the appropriate descaling solution and water ratio for your coffee maker.
- Empty the water reservoir of your coffee maker and pour the descaling solution mixture into it.
- Place an empty carafe or cup on the coffee maker’s warming plate to collect the solution as it runs through the machine.
- Start the coffee maker and initiate the descaling process. Most machines have a specific descaling mode or button. Refer to your user manual for the exact steps.
- Allow the descaling solution to run through the coffee maker completely. This process may take a few minutes.
- Once the descaling process is complete, discard the solution from the carafe or cup.
- Rinse the water reservoir thoroughly to remove any remaining descaling solution.
- Fill the water reservoir with clean water.
- Run a brewing cycle with just water to flush out any remaining descaling solution from the machine.
- Repeat this process with clean water one more time to ensure all traces of descaling solution are removed.
Remember to consult your coffee maker’s user manual for any specific descaling instructions or precautions. Regular descaling will help extend the lifespan of your coffee maker and guarantee optimal coffee brewing every time.
Clean the exterior of the coffee maker
Keeping the exterior of your coffee maker clean is important for maintaining its appearance and preventing any buildup or residue from accumulating. Here are the steps to clean the external surfaces of your coffee maker:
- Unplug the coffee maker: Before starting the cleaning process, always unplug your coffee maker to ensure your safety.
- Remove any removable parts: If there are any removable parts such as the carafe, lid, or filter basket, take them off and set them aside.
- Wipe down the exterior with a damp cloth: Dampen a clean cloth with warm water and gently wipe the exterior surfaces of the coffee maker. Pay extra attention to any areas that may have stains or spills.
- Clean stubborn stains: If there are any stubborn stains on the exterior, you can use a mild dish soap solution. Dip a cloth in the solution and gently scrub the stained areas. Rinse the cloth and wipe away any soap residue.
- Dry the exterior: After cleaning, use a dry cloth to carefully dry the exterior of the coffee maker. Make sure there is no moisture left on the surfaces.
- Clean the carafe: If your coffee maker has a glass carafe, you can wash it separately using warm, soapy water and a sponge or cloth. Rinse it thoroughly and dry it before reattaching it to the coffee maker.
- Reassemble the coffee maker: Once all the parts are clean and dry, reassemble the coffee maker by putting back any removable parts you took off earlier.
- Plug in the coffee maker: Finally, plug in your coffee maker and you’re ready to brew a fresh pot of coffee!
Regularly cleaning the exterior of your coffee maker will not only make it look sparkling and new but also ensure that it stays in good working condition.
Reassemble and test the coffee maker
Once you have thoroughly cleaned all the individual components of your coffee maker, it’s time to reassemble them and test the machine to ensure everything is in working order.
Steps to reassemble your coffee maker:
- Start by placing the clean carafe back on the coffee maker’s warming plate.
- Next, reinsert the cleaned water reservoir into its designated slot on the coffee maker. Make sure it is securely in place.
- If you have a removable brew basket, place it back inside the machine. For those with a built-in brew basket, ensure it is clean and free from any leftover grounds.
- If you removed the coffee maker’s filter, replace it with a new one or thoroughly clean and dry the existing filter before inserting it back into the machine.
- Double-check that all the components are properly in place and secure.
Testing the coffee maker:
Once the coffee maker is reassembled, it’s important to test it to ensure everything is working correctly and that the machine is producing a great-tasting cup of coffee.
Follow these steps to test your coffee maker:
- Fill the water reservoir with clean, fresh water.
- Add your desired amount of coffee grounds to the brew basket or filter.
- Turn the coffee maker on and wait for it to brew a full pot.
As the coffee brews, keep an eye out for any leaks, unusual noises, or irregularities in the brewing process. If you notice anything out of the ordinary, you may need to troubleshoot or contact the manufacturer for further assistance.
Once the brewing process is complete, pour yourself a cup of hot, freshly brewed coffee and enjoy the results of your clean coffee maker!
FAQ
Why is it important to clean a coffee maker regularly?
Regular cleaning of a coffee maker is crucial to prevent the buildup of mineral deposits, oils, and other residue that can affect the taste of your coffee and reduce the machine’s efficiency.
How often should I clean my coffee maker?
It is recommended to clean a coffee maker once every month to ensure optimal performance and coffee flavor.
Can I use vinegar to clean my coffee maker?
Yes, vinegar is an effective and natural cleaning agent for coffee makers. Mix equal parts of vinegar and water, then run the mixture through a brewing cycle. After that, run two cycles with plain water to remove any vinegar residue.
What other tools do I need to clean my coffee maker?
In addition to vinegar and water, you will also need a clean cloth or sponge, a small brush or toothbrush to scrub hard-to-reach spots, and mild dish soap if necessary.
Is it safe to clean coffee maker parts in the dishwasher?
Most coffee maker parts, such as the carafe, filter basket, and removable water reservoir, are usually dishwasher safe. However, it is important to check the manufacturer’s instructions to ensure that specific parts are dishwasher safe.